Run Streamlit Apps From Colab without Ngrok
Writing streamlit scripts and Building react apps for learning & testing

I will demonstrate how to use Google Colaboratory to run Streamlit scripts for learning and testing. This is useful because it can help to avoid issues with incompatible libraries and other errors that can arise on our personal computers.
The following steps allow us to run and custom our apps
- Install streamlit library
- Write the script app
- Run streamlit in our session
- Find our Colab session ports
- Clone an application repository and run it
- Custom domain with localtunnel
1. Install streamlit library
%%capture
!pip install -q streamlit
Firstly, we need to install the dependency by using pip command. %%capture magic command can be used to prevent the output from being displayed in the cell after running it. The exclamation point ! preceding a command tells the compiler to run a single terminal command
For some reason, the latest version in colab has an issue with protobuf library, so we upgrade it by using the following command [1]:
!pip install --upgrade protobuf2. Write the script app
Sequentially, we need to write a simple python file to do it that we can use %%writefile magic to tell the cell write the content of the cell to a file called app.py. The entire coding body should be placed inside this file.
So lets add the body:
%%writefile app.py
import streamlit as st
from PIL import Image
favicon = Image.open("favicon.ico")
st.set_page_config(page_title='⭐️Romellfudi Github Star Tracking ⭐️', page_icon = favicon, layout = 'wide', initial_sidebar_state = 'auto')
hide_st_style = """
            <style>
            #MainMenu {visibility: hidden;}
            footer {visibility: hidden;}
            header {visibility: hidden;}
            </style>
            """

st.markdown(hide_st_style, unsafe_allow_html=True)
3. Run streamlit in our session
Just run the streamlit command with exclamation point to start running. The output of the cell should update as the user interacts with the react page.

4. Find our Colab session server ports
As we can see the output shows a local network URL, however, that domain is not our local machine. Therefore, we can not access to the app directly.
Now we try to find the real domain for our session. Just need use google colab Python library google.colab and import output script which contains the functions to open the server kernel as website using a port as a parameter. In our case we know the default stream port is 8501 .
from google.colab import output
# output.serve_kernel_port_as_iframe(8501)
display(output.serve_kernel_port_as_window(8501))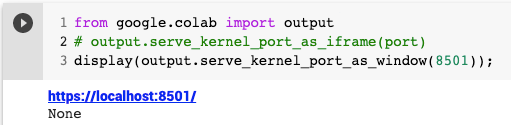
The serve_kernel_port_as_iframe allows inflate the output cell with the site instead of serve_kernel_port_as_window that generates an external link.
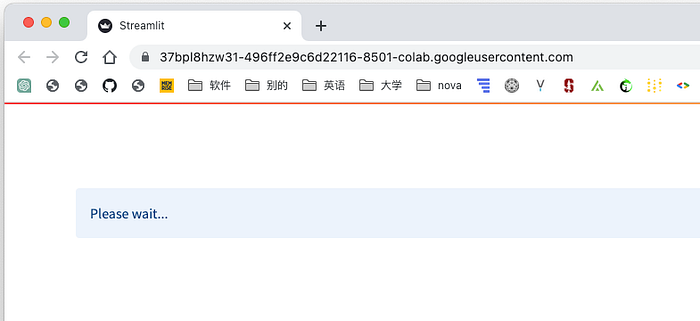
Let run streamlit app again and go to the external link by clicking. Some times the app keeps waiting a long time. That is the reason why we should use localtunnel in the step six:
5. Clone an application repository and run it
If we have a Github repository, we can use it easily. Just clonning the repo using the git command in the cell with exclamation point ! , for this example we use a Goodreads app created by tylerjrichards to scraper HTML tables:
!git clone https://github.com/tylerjrichards/streamlit_goodreads_app.gitThen, we need to set in the root of the cloned directory:
%cd /content/streamlit_goodreads_appSequentially, install the dependency from the requirement file:
!pip install -q -r requirements.txtNow, lets run the streamlit app using books.py which has application script:
!streamlit run books.py 6. Custom domain with localtunnel
According to the site, Localtunnel is a tool that allows you to easily share a local development server to the public internet. It creates a secure tunnel from your local machine to a public URL that you can share with others. This is useful for testing and debugging applications that are running on your local machine, but need to be accessed over the internet. Thus why we can use it directly in any Google Colaboratory environment:
For our example, we run the full coding statements in one cell:
!streamlit run books.py &>/dev/null& nohup bash -c 'npx localtunnel --port 8501 --subdomain romellfudi>.md' &>/dev/null&
!sleep 10s;cat .md- The first part we indicate the script file called books.py.
- "&>/dev/null&" avoides printing unnecesary outputs.
- "nohup bash -c " allows run npx command.
- "npx localtunnel" create a secure tunnnel from Colab to the public machine, we custom the port, in our case 8501 and the domain romellfudi, you can change them to your preference.
- The final domain will be appended to a plain file called .md
- Add “&>/dev/null&” again to prevent printing unnecessary outputs for localtunnel command.
- In the second line we indicate a sleep threshold timing to wait the domain was generate correctly, and then print the final url.
In case you do not specify the domain, it will generate randomly.

We can see the final result page:
Conclusion
Colaboratory has everything to create an environment to test your react application for reporting task or just training/testing different streamlit scripts. Localtunnel is already integrated with Colaboratory that helps to build any visualization dashboard for Exploratory Data Analysis operations.
You can find the colab notebook here.
Thank you for being here, please comment down your views, if any mistakes found the article will be updated